Thursday 24 October 2013

Stitch with Your Heart

Time and time again, Kusano-senei, implored us to stitch with our hearts. This was not a new concept to us.

Nuido is the name for the form of Japanese embroidery taught under the auspices of the Japanese Embroidery Center in Atlanta. The word Nuido is made up of two parts; Nui is the Japanese word for embroidery (also known as shishu), and Do refers to the acquisition of technical skills and knowledge. Do also refers to the development of the spiritual components of the art of Nuido. We are taught that Nuido has three aspects:
  • Rationality - the acquisition of technical skills and knowledge
  • Sensitivity - the development of artistic sensitivity and awareness
  • Spirituality - understanding the spiritual aspects of shishu
I can see how this relates to the St Francis of Assisi quote:
  • He who works with his hands is a labourer. (Rationality)
  • He who works with his hands and his head is a craftsman. (Sensitivity)
  • He who works with his hands and his head and his heart is an artist. (Spirituality)
I have done needlework from an early age. At first I learned by following the instructions in kits or designs printed in magazines. I was working mainly with my hands. In 2005, when I began to learn Japanese embroidery I was very aware that I was stitching with my hands and my head, I had to really concentrate on learning how to handle the silk and the various techniques. The first time I was consciously aware of stitching with my heart was while stitching Flutterbies for my parents Golden Wedding Anniversary. Now, whenever I sit down at my frame, the whole of me is present: my hands; my head; my heart. If my heart is not in it, I stop and come back to it another time. I still consider embroidery to be my hobby, something I do for pleasure and relaxation, but I have also come to think of my embroidery as my art, something I put my heart and soul into.

© Shizuka Kusano/Carol-Anne Conway

The hands are the exit of the spirit
- Iwao Saito, late master of Kurenia Kia embroidery center
Happy Stitching

Thursday 29 August 2013

A Very Special Petal

With every student stitching a different design Kusano-sensei, Watakabe-san and Ishii-san worked hard to ensure that we all knew how to execute the various techniques on our own piece.

The cherry blossoms on my piece are worked in long and short stitch. Kusano-sensei indicated that she would like me to stitch one of these petals first. Did she know how I have struggled with this technique? Once I had transferred the design to the fabric and twisted some silks, Ishii-san demonstrated how to do the first row of long and short stitch. She began in the centre of the petal and stitched to towards the right. When she stitched the right hand section, she invited me to stitch the left hand section of the same petal.

When I had completed the left had section, Watakabe-san demonstrated how to stitch the next rows in long and short stitch. Again, she began at the centre and stitched the right hand section then invited me to stitch the left had section.

When that was done, Kusano-sensei demonstrated how to stitch the last rows of long and short stitch and again she stitched the right hand section leaving me to complete the left had section.

© Shizuka Kusano/Carol-Anne Conway

As a result I have a very special reminder of the class (as if I needed one) - one petal stitched by Kusano-sensei, Watakabe-san, Ishii-san and myself.

Happy Stitching

Tuesday 27 August 2013

A Very Special Class

It is a long drive from Manchester to Edinburgh but in May 2011 we thought it was worth the trip to see Kusano-san’s embroidery. By the time we had travelled there and back we were very tired but still on a high from the wonderful work we had seen. When Kusano-san heard that some UK students of Japanese embroidery would be visiting the exhibition, she arranged to be there to meet us. As much as we wanted to know about her work, she wanted to know about us and why we were learning JE. She is a very warm and charming person and we all felt very inspired by her and her beautiful designs.

When we returned to Manchester, tired but still on a high, Jane said if we had found an hour in Kusano-san’s company such an inspiration, imagine how it would be to take a class with her. I think we all went to bed and dreamt of such an opportunity.

Well, it seems that dreams can come true. At the end of June, Kusano-sensei returned to the UK to exhibit her work and teach a five day Special Class in Ferndown. And it truly was a special class. Kusano-sensei designed 24 unique designs, one for each student. We were given a choice of designs ahead of the class and asked to submit our first, second, third choices. All of the designs were so lovely, I would have been happy with any one of them but I was lucky enough to get my first choice, New Moon and Cherry Blossom.

Shizuka Kusano

Kusano-sensei brought with her a selection of Kimono, obi, tapestries and other item for the exhibition. Some I had seen before in Edinburgh but there was also a selection of new work that I have not seen before. The exhibition was set up in the very room where the course took place so during class we were surrounded by beautiful embroideries.

Watakabe-san

Throughout the week, we covered most of the techniques JEC students are familiar and learnt some slight variations on the methods we already knew. Every day Kusano-sensei delivered one or more short lecture and gave several demonstrations to the entire class. Throughout the day Kusano-sensei and her two delightful assistants, Watakabe-san and Ishii-san, worked tirelessly giving individual demonstrations and guidance to each student.

Ishii-san

If I had imagined that taking a class with Kusano-senei would be wonderful then the reality far surpassed my imagination. I learnt a great deal in practical terms but I gained something quite unexpected from Kusano-sensei’s gentle but enthusiastic encouragement. Kusano-senei made me feel like an artist.

"He who works with his hands is a labourer.
He who works with his hands and his head is a craftsman.
He who works with his hands and his head and his heart is an artist.
"
- St. Francis of Assisi


Class of 2013

Happy Stitching

Friday 9 August 2013

Flower Circle – A Circle of Friends

It seemed to me that the Flower Circle was a quick project. In terms of time on the frame, for me at least, it was a quick project. My Japanese embroideries are usually on the frame for a year or more; this piece was on the frame for a mere 2 months and 4 days! So I was somewhat surprised when I totalled my time sheet to find that I had put in 74 hours of stitching. That just shows how 15 minutes here and there, and an hour or two at the weekend can add up!

© Shizuka Kusano/Carol-Anne Conway

The Flower Circle was also stitched by several others and the completed pieces were displayed together in the same room as the recent exhibition of Kusano-san’s work in Ferndown. Since I began learning Japanese embroidery in 2005, the stitchers of those other versions have become some of my dearest friends. We have spent many pleasant hours together; stitching, chatting, pawing over books and the internet, and admiring each other’s work.

© Shizuka Kusano/Carol-Anne Conway

When I returned home with my Flower Circle, it occurred to me that the Flower Circle reminds me of the friends I have made through Japanese embroidery. Although unique and individual, like the flowers themselves we all have one thing in common – our love of Japanese embroidery. Within the circle one flower might be closer to some than others, and some even overlap. Our group is like that, because of proximity or other interests, one person might be more closely associated with another but sometimes more, or all, of us are able to come together. And sometimes life might mean we do not have as much time for Japanese embroidery and our friends as we might like and we fade into the background like my purple flower. But a circle is an amazing thing. It is eternal with no beginning and no end. And made of the right stuff a circle is very hard to break, put under pressure and it may bend and distort but it remains intact.

© Shizuka Kusano/Carol-Anne Conway

I have decided to rename my Flower Circle "A Circle of Friends".

Happy Stitching

Saturday 27 July 2013

Flower Circle – Finished

I was still dissatisfied with the stitching on the outlined flower and slightly concerned about whether the purple flower upset the balance of the design but there was no time left for me to make any changes. As it stood I only had two days to do the finishing, remove Flower Circle from the frame, and to lace it onto a board.

© Shizuka Kusano/Carol-Anne Conway

I had allowed 24 hours with the frame resting in a prominent position so I would spot any glaring mistakes before I began the finishing process. Every time I passed the frame I stopped to take another look at the it and, although I still had doubts about the purple flower, I was rather pleased with the overall effect. Mostly, I was pleased that I felt I had done what I originally intended to do – maintain the balance of the original design.

© Shizuka Kusano/Carol-Anne Conway

The reason for my haste and lack of time for making any alterations was that my Flower Circle, together with eight other versions, was to be show to Kusano-san during her visit to the UK. It was a great honour to be able to show her our work and an even greater honour to have her critique the pieces. Kusano-san was complimentary about all of the Flower Circles. She was very kind not to mention some of the substandard stitching on my piece. Instead she commented that colour scheme and choice of techniques was well balanced – I was thrilled as this was something I had strived for. Kusano-san also commented on the purple outlined flower and the Flutterbies flower, saying that they added an air of mystery to the piece. I cannot claim that that was my intention but I am pleased that those two flowers caught her attention.

© Shizuka Kusano/Carol-Anne Conway

© Shizuka Kusano/Carol-Anne Conway

It was extremely generous of Kusano-san to give us the design and encourage us to stitch it in our own way. I wonder if she remembered doing that. She certainly seemed delighted to see them. This has been a unique and special project for those of us who took part. Mine will always remind me of the time a group of us drove from Manchester to Edinburgh and back in a day for the opportunity to see Kusano-san’s work and of our second, amazing, encounter with her.

© Shizuka Kusano/Carol-Anne Conway

© Shizuka Kusano/Carol-Anne Conway

Happy Stitching

Thursday 25 July 2013

Flower Circle – Leaves

When all of the flowers were complete I lent my frame against the wall so that I could look at it from a distance. I wanted to evaluate the balance of the composition and consider how I should stitch the leaves. In the end I decided I wanted to keep them as light and airy as possible but also to pick up again on the gold used elsewhere in the design. To contrast with the twisted gold on the flowers, I couched #3 gold around the outline of the leaves. I often use red couching thread for couching gold but on this occasion I made a 1 into 2 twist from the same red/orange silk that I had used for the pollen of some of the flowers. When the outlines were finished I again rested the frame against the wall. I felt that the simple outline was not quite sufficient so I added a central vein to each leaf. This time, when I leant the frame against the wall, I was satisfied.

© Shizuka Kusano/Carol-Anne Conway

© Shizuka Kusano/Carol-Anne Conway

© Shizuka Kusano/Carol-Anne Conway

Happy Stitching

Monday 22 July 2013

Flower Circle – Flutterbies

For the third of the large centred flowers I had a slightly different plan. It was a combination of something I had seen in the Kurenia-kia exhibition and a homage to one of my favourite Kusano-san designs. I have already referenced Hana utsuroi (Transient Flowers) in my Shibori Samuri. In her piece Kusano-san fills some of the butterfly wings with flowers. In my Flower Circle I filled one of my flowers with butterflies!

I traced the outline of the remaining flower and played around drawing butterflies into the space. When I was happy with the design I retraced it onto tissue paper. I thought that the butterflies were a bit small to stitch transfer so decided to transfer them with shell powder. I have not had much success with this method in the past but while in Atlanta I was able to observe how Uematsu-san did it. The shell powder is mixed with a little water. I observed that Uematsu-san used less water that I do making a slightly thicker solution. I also observed that Uematsu-san painted more of the solution onto the reverse of the tracing than I did. When the paper was completely dry this left a heavier deposit of shell powder. I carefully placed the tracing onto my fabric – I had traced the outline of the flower so that I could position the tracing accurately. Then with a book pressed to the underside of my fabric I firmly rubbed over the tracing paper with the back of my thumb nail.

© Shizuka Kusano/Carol-Anne Conway

This certainly transferred a goodly amount of shell power that showed clearly on my fabric but, oh my, the outlines were very thick on those tiny butterflies. I could just make out enough of the shape to give me an impression of each butterfly and as they are so small I decided to stitch them freehand using the 'lines' to guide me.

© Shizuka Kusano/Carol-Anne Conway

© Shizuka Kusano/Carol-Anne Conway

They are a bit asymmetrical but I figured that they looked like they were flitting around. I was slightly concerned about the residue of shell powder but a good beating with my velvet cushion removed all trace of the powder and I was ready for the next step.

© Shizuka Kusano/Carol-Anne Conway

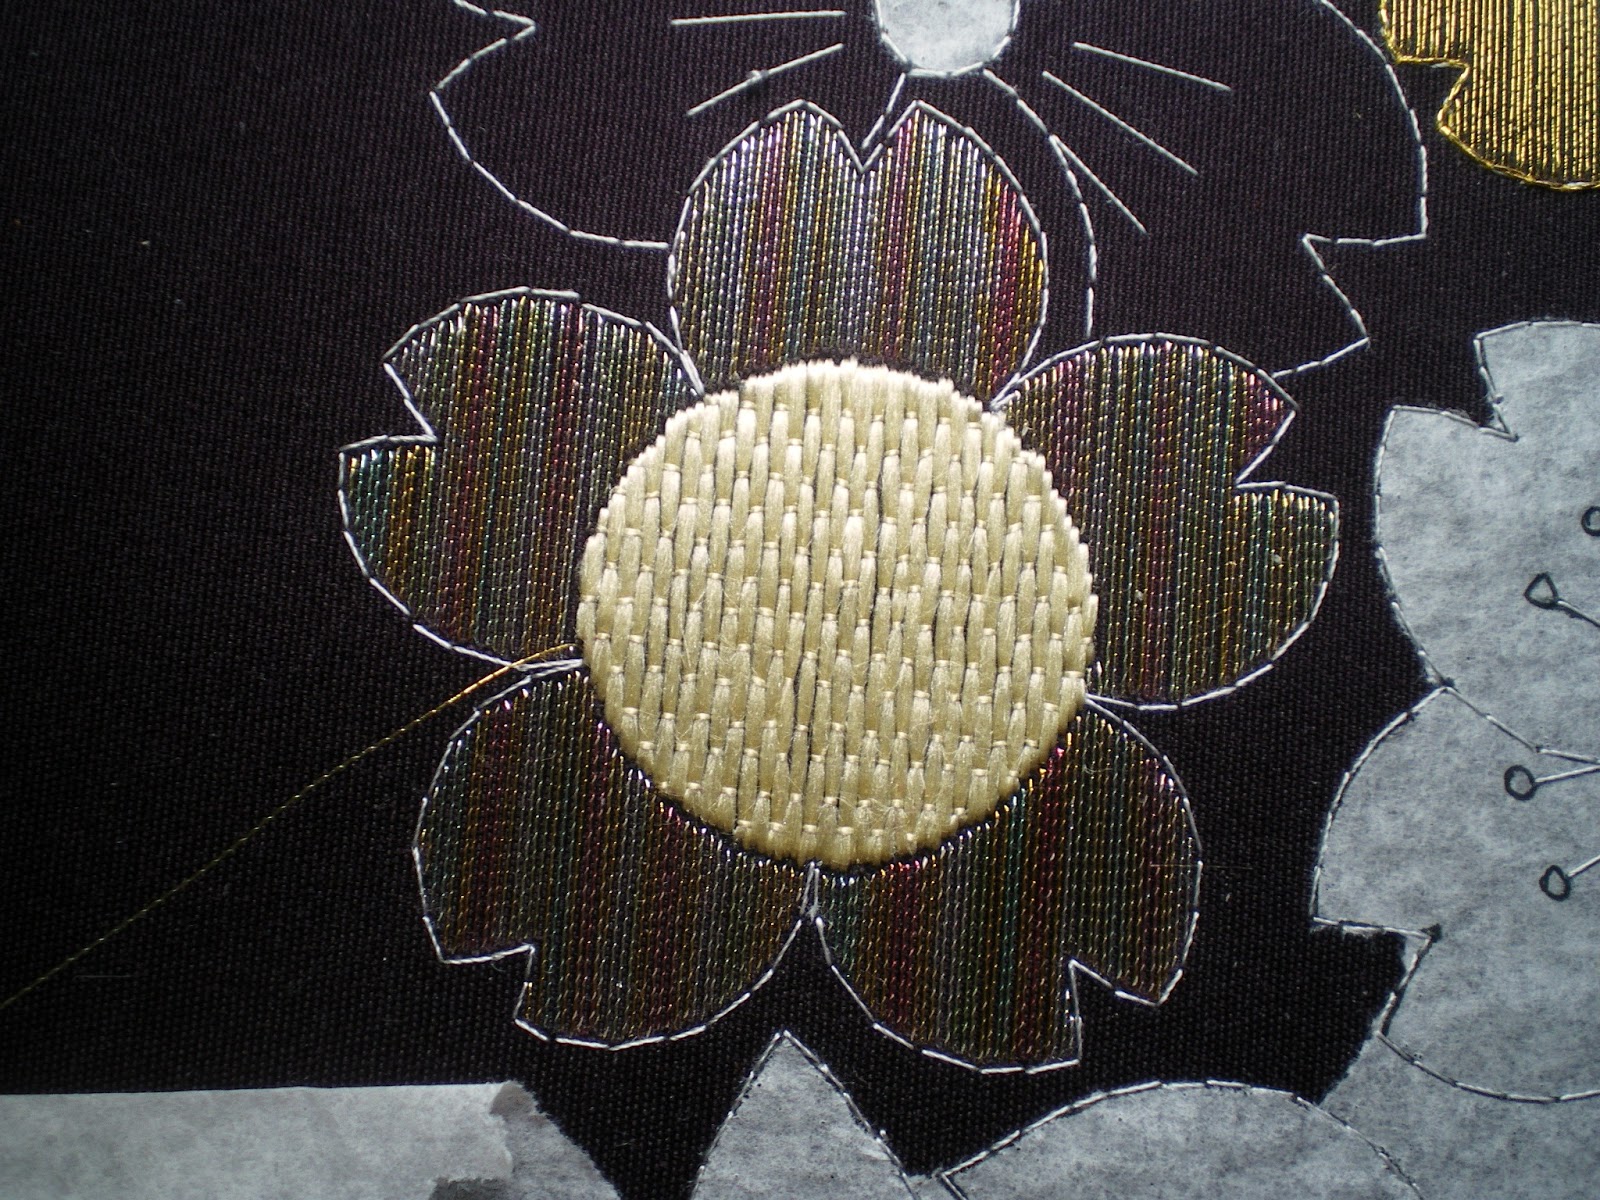
At the Osaka exhibition I had seen some motifs that had another motif stitched inside them with sugabiki (fuzzy effect) over the top. I thought the effect was very lacy and delicate. As with the other large centred flowers I filled the petals with sugabiki but this time I only stitching in every other weft valley so that the butterflies would still be visible under the #1 gold thread.

© Shizuka Kusano/Carol-Anne Conway

I then filled the flower centre in the same way but stitching into the valleys that had been left unstitched on the petals to give a staggered effect. I hoped that this would differentiate the centre from the petals but the effect was too subtle so I went back and stitched into the remaining valleys with the shell gold thread.

© Shizuka Kusano/Carol-Anne Conway

© Shizuka Kusano/Carol-Anne Conway

Finally I outlined the petals and the centre of the flower with couched twisted gold.

© Shizuka Kusano/Carol-Anne Conway

Happy Stitching

Thursday 18 July 2013

Flower Circle – Outlined Flowers

I saw the remaining two flowers with small centres as being more in the background, especially the one in the centre of the ring. I wanted to stitch them in a minimal way so that they would recede but again I wanted to stay true to their original appearance. I decided to outline them but this time with a broader outline. I’m not sure if this stitch qualifies as matsui-nui (staggered diagonals) or if it is a narrow diagonal foundation.

I had a lot of difficulty getting the angle of the stitching to work, especially at the points of the petals. I was not entirely satisfied with the stitching but decided to leave it for the time being and restitch it only if time allowed.

© Shizuka Kusano/Carol-Anne Conway

To really emphasise that this flowers is the same as the other small centred flowers I stitched the centres, the stamen and the pollen in the same way.

© Shizuka Kusano/Carol-Anne Conway

© Shizuka Kusano/Carol-Anne Conway

I wanted to further emphasis that the fourth of these flowers was farthest in the background. I also wanted to experiment with an idea that had been floating around in my head for a very long time. Many of the kimono and obi we see use more than one textile technique. The weaving, dying and embroidery all combine to create a comprehensive design. Kusano-san uses this concept a lot in her own work. It is not unusual to see a piece of kanoko shibori appliquéd onto her ground fabric and hitta-gake stitched elsewhere on the same piece. Where the background has a woven effect that might be picked up in a stitched version of the same effect. I wanted my background flower to appear as if it had been woven into the fabric so I stitched it entirely in a silk that matched the ground colour as closely as possible.

© Shizuka Kusano/Carol-Anne Conway

Having worked out most of my difficulties with diagonal stitch on the previous flower, I felt I stitched this one better. Perhaps I should have done this one first as the stitching is less noticeable! Because I wanted the flower to appear woven I did the centre, the stamens and the pollen in the same purple and used a single straight stitch for the pollen rather than Japanese round knots.

© Shizuka Kusano/Carol-Anne Conway

The effect is pretty much what I had intended and in that respect I am pleased with this flower. However I was concerned that it appeared as a hole in the centre and unbalanced the design. Again I decided to leave it for now and consider restitching it if time allowed.

Happy stitching

Tuesday 16 July 2013

Flower Circle – Matsui-nui and Midare-sashinui

Four of the flowers have five overlapping petals with a small circular centre and long stamens. I did not want to do all four flowers in exactly the same way but I wanted to maintain the balance of the design so I wanted to stay true to their original appearance. I based two of the flowers on another of the embroideries I had seen in the Kurenai-Kai exhibition in Osaka. This one was featured on the postcard of the exhibition so I had a small picture to refer to.

I first outlined each of the petals with Matsui-nui (staggered diagonals).

© Shizuka Kusano/Carol-Anne Conway

I then partially filled each petal with Midare-sashinui (random realistic effect).

© Shizuka Kusano/Carol-Anne Conway

I used two shades of pink starting with a two rows of very pale pink.

© Shizuka Kusano/Carol-Anne Conway

I then used a slightly darker shade of pink towards the centre of the flower to give texture but faded out the stitches as I thought fully filled flowers would be too dominant for background motifs.

© Shizuka Kusano/Carol-Anne Conway

To give some continuity with the sugabiki flowers I stitched the centre and the stamens in twisted gold. The centre has two layers of silk padding.

© Shizuka Kusano/Carol-Anne Conway

Finally I added the pollen. I chose a colour that I though contrasted well with the purple background and made a soft 4 into 1 s-twist.

© Shizuka Kusano/Carol-Anne Conway

Happy Stitching

Tuesday 25 June 2013

Flower Circle – Mushiro-nui and Sugabiki

When I was planning to work the Flower Circle entirely in gold work, I thought that I would do the large circular centres in maze pattern couching. On my last day in Japan I visited an exhibition of work by the tutors and students of Kurenia-kia. I saw some techniques that I had not seen before and wanted to try to replicate some of these in my design. Unfortunately, photography was not permitted so I had to rely on my notes, my memory and a postcard of the exhibition. One of the techniques was a variation on mushiro-nui (woven effect). It is not terribly different from the version taught by the JEC but I thought it was very pretty.

© Shizuka Kusano/Carol-Anne Conway

I don’t know why it did not immediately occur to me that I could have worked this version in more or less that same way that I have been taught. Instead, on my first attempt, I filled the entire circle with a flat silk foundation using two strands and then struggled to work the holding stitches.

© Shizuka Kusano/Carol-Anne Conway

When I stitched the second flower centre I made two stitches, then left room for two stitches, stitched two more, etc. I then worked the holding stitches over these foundation stitches before filling in the gaps and working the holding stitches over those. It was much simpler that the first flower.

© Shizuka Kusano/Carol-Anne Conway

I had planned from the outset to work the petals of these flowers in sugabiki (fuzzy effect). I had seen this done in metallic threads on Embroidery Sculpture and thought it very effective. Sugabiki is usually worked in every other weft valley but I stitched #1 gold into every valley so that the effect would be more gold than purple. It is normal to use a holding stitch on any stitch 1 cm or longer but I did not want to disturb the solid sheen so have omitted the holding stitches.

© Shizuka Kusano/Carol-Anne Conway

Finally, I outlined each petal and the centre of each flower. On the gold flower I used JEC twisted gold. On the shell gold flower I wanted a matching outline so I twisted together two strands of shell gold.

© Shizuka Kusano/Carol-Anne Conway

Happy Stitching

Saturday 22 June 2013

Butcher, Baker, Needlework Collector

My day has been surreal. It has included an episode that could easily have featured on the Jeremy Kyle Show or Eastenders but that is not a subject for this blog and I am really trying to forget about it, difficult as that is.

OK onto the equally strange encounter that bears some relation to this blog, although it may not seems so at first. Oncev a year J hosts a wine evening and we (I) prepare a meal related to the evenings theme. We try to source the finest ingredients in our locale and for many of those The Covered Market, Oxford is the place to go. There is more than one excellent butcher in the Market and we have no preference of one over another. Today, for no particular reason we went into one I don't recall patronising before. Whilst waiting to be served I was idlely looking at some leaflets on the counter. One in particular caught my attention, while out of the corner of my eye something else was registering. The leaflet was advertising the Michael and Elizabeth Feller books. I thought that an unusual subect for a butcher to sponser but the thing in the corner of my eye that was trying to attract my attention was the name of the butcher "M Feller and Daughter". M FELLER and daughter!!

When it came to my turn to be served, instead of placing my order, I pointed to the flyer and said "are you related?". "Ah!", he said, pointing to someone behind me, "that's the man you need to speak to."

For the next 30 minutes my attention was devided between ordering the ingredients I needed the evening meal and discussing the Michael and Elizabeth Feller Collection, their forthcoming exhibition at the a Ashmolean Museum, the related class which is fully booked within 24 hours of opening, the Threads of Silk and Gold Exhibition, and other embroidery related stuff.

When we left I said to J "do you think that was Michael Feller?". J said that was the impression he had been given. This evening I can't decide whether the butcher M Feller and Michael Feller, Needlework Collector, are related or one in the same person. Or whether I dreamt the whole encounter as an antidote to the vile episode that occured an hour earlier.

Happy Stitching

Friday 21 June 2013

Flower Circle – Hitta-gake

The first time I used hitta-gake (tie die effect) was on Suehiro. I used white silk to stitch the best foundation I had done so far and when I realised what I would do to that foundation I nearly cried. As it turned out, I enjoyed stitching hitta-gake and was reasonable pleased with my first attempt.

© Shizuka Kusano/Carol-Anne Conway

I next used hitta-gake on the Shibori Samurai on Flutterbies. That time I was not so pleased with my foundation layer but I felt that the hitta-gake was executed better. On both of these designs the hitta-gake has a white foundation on a white ground fabric. I have always thought that it might be more effective on a dark background.

© Shizuka Kusano/Carol-Anne Conway

Hitta-gake features a lot in Kusano-san’s designs. Sometimes she uses the stitched version and sometimes she appliqués kanoko shibori fabric onto her ground fabric. I decided to fill the two outline flowers with hitta-gake as homage to Flower Circle’s designer.

© Shizuka Kusano/Carol-Anne Conway

I began with a flat white silk foundation using 2 strands to ensure good coverage of the ground fabric.

© Shizuka Kusano/Carol-Anne Conway

For the hitta-gake I choose a silk that matched the ground fabric as closely as possible. I wanted the finished effect to give the impression that kanoko shibori had been died into the fabric.

© Shizuka Kusano/Carol-Anne Conway

The JEC use two stitches in the centre of each lattice to represent the dot that is characteristic of kanoko. Kusano-san does this in a few different ways but she very often uses a sagara-nui (Japanese round knot) for the dot and I choose to do mine that way. I am still a bit hit and miss with sagara-nui but I think I am getting better and this gave me a fair amount of practice at them.

© Shizuka Kusano/Carol-Anne Conway

Happy Stitching